Quick Guide | Set Up & Start Using
In this article, we're going to walk you through the basic steps for setting up your pipelines and starting to use them. If you'd like in depth training on any of the features, you'll find articles related to those specific topics.
STEP 1: Install Chrome Extension: Click here
- Open Chrome Webstore
- Search for GroupTrack CRM
- Click "Install"
Once you have the Chrome web browser, go to the Extension installation page and click "Add to Chrome". You will be prompted to confirm that the Extension will have access to "www.facebook.com". Click "Add Extension".
Tip: "Pin" the GroupTrack Icon to your browser's extensions toolbar! You can do this by clicking the puzzle piece and then "pinning GroupTrack"
Note: The GroupTrack "Hero" Icon in your browser will only be in color when on Facebook™
STEP 2: Access Webapp to Continue Set Up: App.grouptrackcrm.com
- The GroupTrack CRM Web App can be accessed at any time from any device, including desktop computers, laptops, tablets and phones. This gives you full access to your CRM even when not inside of Facebook™ or using the Chrome web browser.
- All changes made to either the Extension or the Web App are synchronized in real time to the other, so your data is never out of date.
STEP 3: Set Up Your First Pipeline | Catch All Pipeline
- Since we know you connect with people outside of your Facebook™ Groups, we wanted you to have the ability to track leads everywhere! The "Catch All" Pipeline is where you’ll add anyone you’d like to track OUTSIDE of your Registered Groups. For example, if you’re looking at someone on your friends list, business page, news feed, profile page, Messenger, or non-registered group, and add them to GroupTrack, they’ll be added to the HOLDING TANK by default.
- The purpose of the Catch All Pipeline is for you to have a place and process for bringing leads from "prospect' to "group member"
- Check out video overview that covers what the Catch All Pipeline is and how to set it up
-

- If you add anyone from the following locations, they will be added to the "Catch-All Pipeline" (even if they're in one of your groups):
- News Feed
- Profile Pages
- Business Pages
- Groups You Do NOT Own
- Events
- Facebook™ Messenger
- Friends List
- Not on Facebook™ (Coming Soon!)
- Etc!
- Once you're in the WebApp,
- Click "Set Up & Training" tab on the left hand side.

- You'll see the steps you need to take to set up your pipeline listed on under the "welcome." Click through each step for directions:
- Pipelines: This tab will explain what pipelines are and how they work with GroupTrack. Click "Set Up Pipelines"
- This will take you to the steps needed to set up your first pipeline. Make sure the "Catch-All" Is selected in the drop down menu.
- General:
- This will ask if your pipeline is connected to a Facebook™ Group or not. Your "Catch- All Pipeline Should not be. Say NO.
- Stages: Stages are chronological steps you would take a contact through to get them from A to Z.
- Once you click on the "stages" tab you will see the "Stages, Description, and Message Templates" we've provided for you. You can edit, deleted, add, and customize these however you'd like to fit your particular business.
- Once you've made your stages, descriptions and message templates the way you'd like, click the next tab.

- General:
- GLOBAL Tags
- Whereas "Stages" are chronological steps you would take a contact through to get them from A to Z, "Tags" are "labels" with descriptive information about the person, that is not related to their stage. On this tab, you'll determine if there are any tags you'd like associated with this pipeline. In other words, when you're bringing a contact through this pipeline, are their any labels/tags you like to assign them?
- Tag Sets are also known as Tag Categories. These are containers to hold labels for your Contacts, grouped by common themes.
- Tags: The Labels within that category.
- Whereas "Stages" are chronological steps you would take a contact through to get them from A to Z, "Tags" are "labels" with descriptive information about the person, that is not related to their stage. On this tab, you'll determine if there are any tags you'd like associated with this pipeline. In other words, when you're bringing a contact through this pipeline, are their any labels/tags you like to assign them?
- Message Templates: Here you will see the message templates we gave you with the Catch All Pipeline.
- On this tab you may edit, delete or create new templates.

- Integrations: Pipeline Integrations allow you to synchronize GroupTrack contact data with external systems when certain conditions are met.
We currently have direct integrations with a number of 3rd party email automation platforms, as well as Google Sheets and webhooks.
- List of current integrations:
- These CRMs/Email Marketing Platforms have a two way sync with GroupTrack. That means what when you do something in GroupTrack (eg: add tag, move stage, etc) that change will occur in the 3rd party tool as well. All changes in 3rd party tool will also sync back over to GroupTrack too! This is the most robust option.
- Coach Marketing Machine | The All In One Platform for Coaches. The first ever all-in-one platform for coaches and business consultants that gives you the tools, strategies and support you need to succeed. Attract more leads, convert more clients and deliver your coaching.
- Wellness CRM | This is a built for your marketing platform for wellness advocates
- Active Campaign
- Go High Level
- Webhooks
- These direct integrations are a one way sync. Meaning GroupTrack CRM can push changes to them but not the other way around.
- Googlesheets
- Kartra
- ConvertKit
- Streak CRM
- If you want to integrate this pipeline with a 3rd party tool, select the one you choose and follow the steps in the set up wizard.
- What if yours isn't listed? You can integrate with a google sheet and then use Zapier.com to "Zap" changes into your 3rd party tool.
- List of current integrations:
- Workflows: Coming Soon! Pipeline Workflows allow you to perform automated actions at the Contact level when certain Triggers occur.
You can optionally choose to filter each Trigger through a set of criteria and only execute the related Action if the filters are all satisfied.


STEP 4: Add Contacts to The Catch All Pipeline
- When looking at contacts in any of these locations, adding them to GroupTrack will put them in the Catch All Pipeline by default (even if they're a member of your group).
- News Feed
- Profile Pages
- Business Pages
- Groups You Do NOT Own
- Events
- Facebook™ Messenger
- Friends List
- Open Facebook™
- Click the GroupTrack "hero" icon that is pinned to your Chrome Browser. This will turn GroupTrack on.
- Hover over the name of anyone on the page. The "sidebar" will then populate and allow you to add this person to GroupTrack. Watch quick training here.
- Begin working them through your rinse and repeat stages!
STEP 5: Set Up Your Second Pipeline | Prospecting Group Pipeline
- The purpose of the Prospecting Group Pipeline is for you to have a place and process for bringing group members from "prospect' to "paying clients"
- Check out video overview that covers what the Catch All Pipeline is and how to set it up
-

-
People will ONLY be tracked in a pipeline associate with a Facebook™ IF you're LOOKING at the contact IN the group while adding them into GroupTrack.
- Video walk through:
- Once you're in the WebApp,
- Click "Set Up & Training" tab on the left hand side.
- You'll see the steps you need to take to set up your pipeline listed on under the "welcome." Click through each step for directions:
- Pipelines: This tab will explain what pipelines are and how they work with GroupTrack. Click "Set Up Pipelines"
- This will take you to the steps needed to set up your first pipeline. Make sure the "Catch-All" Is selected in the drop down menu.
- General:
- Click "Add New Pipeline" (in the upper right hand corner)
- Name the Pipeline (Suggestion: Title it the name of your group)
- This will ask if your pipeline is connected to a Facebook™ Group or not. Since we're going to connect this to your "prospecting group" on Facebook™ you'll want to toggle over to "yes"
- Enter the URL from your Facebook™ Group. NOTE: If your URL starts with a number, it will not work. Please customize so it start with a letter.
- Press Save

- Then it will as if you'd like to pre-populate the pipelines with the stages, descriptions and message templates provided by GroupTrack. If you would like to import our "Prospecting Group Pipeline Templates" click " Basic Group Pipeline" .
- Stages: Stages are chronological steps you would take a contact through to get them from A to Z.
- Once you click on the "stages" tab you will see the "Stages, Description, and Message Templates" we've provided for you. You can edit, deleted, add, and customize these however you'd like to fit your particular business. The Stages you installed from GroupTrack will show in yellow.
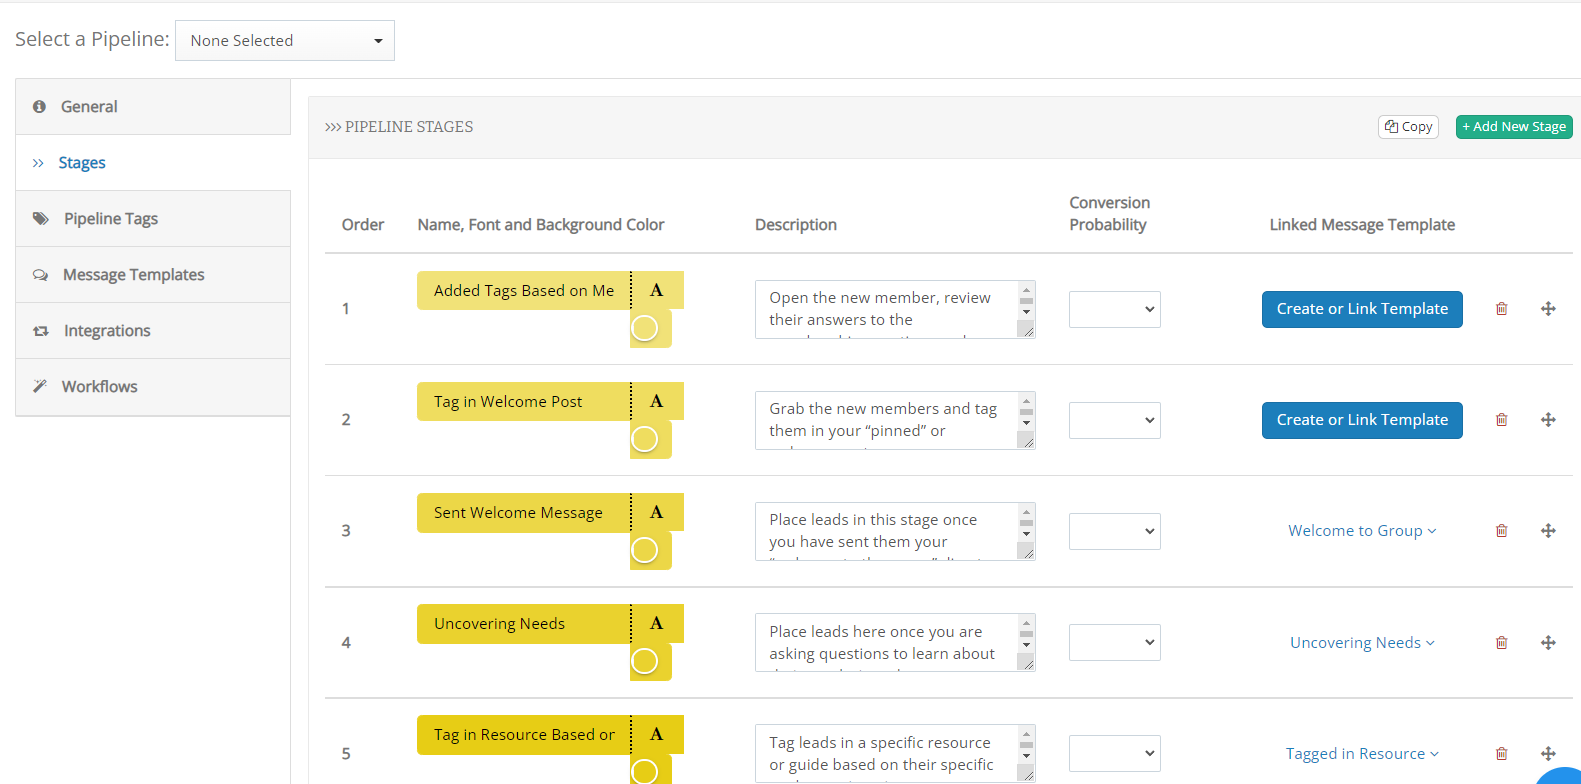
- Once you've made your stages, descriptions and message templates the way you'd like, click the next tab.
- Pipeline Tags
- Whereas "Stages" are chronological steps you would take a contact through to get them from A to Z, "Tags" are "labels" with descriptive information about the person, that is not related to their stage. On this tab, you'll determine if there are any tags you'd like associated with this pipeline. In other words, when you're bringing a contact through this pipeline, are their any labels/tags you like to assign them?
- Tag Sets are also known as Tag Categories. These are containers to hold labels for your Contacts, grouped by common themes.
- Tags: The Labels within that category.
- Whereas "Stages" are chronological steps you would take a contact through to get them from A to Z, "Tags" are "labels" with descriptive information about the person, that is not related to their stage. On this tab, you'll determine if there are any tags you'd like associated with this pipeline. In other words, when you're bringing a contact through this pipeline, are their any labels/tags you like to assign them?
- Message Templates: Here you will see the message templates we gave you with the Basic Group Pipeline
- On this tab you may edit, delete or create new templates.
- Integrations
- If you want to integrate this pipeline with a 3rd party tool, select the one you choose and follow the steps in the set up wizard.
- Workflows: Coming Soon


STEP 6: Add Contacts to The Prospecting Group Pipeline
There are only a few ways you can track someone in a Group-Connected Pipeline like the one you just set up.
- Approving into the Group
- Once in the group
- Add to Pipeline
- Work the group members through the rinse and repeat stages of the Prospecting Group Pipeline
STEP 7: Get Started
More training will be added to this article soon!